原创文章,转载请注明: 转载自pagefault
本文链接地址: nginx中upstream的设计和实现(四)
这此主要是分析发送数据到客户端的部分以及buffering状态下,nginx接收upstream数据的部分,这也是upstream的最复杂的部分,这里我还是忽略了cache部分,以后我会专门写blog来分析nginx的cache部分。
这部分的函数入口是ngx_http_upstream_send_response,这里有一个很重要的标记,那就是u->buffering,这个标记的含义就是nginx是否会尽可能多的读取upstream的数据。如果关闭,则就是一个同步的发送,也就是接收多少,发送给客户端多少。默认这个是打开的。也就是nginx会buf住upstream发送的数据。
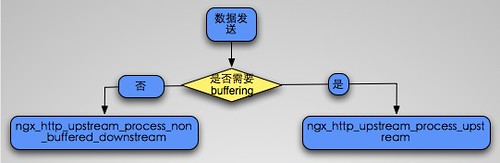
不管buffering是否打开,后端发送的头都不会被buffer,首先会发送header,然后才是body的发送,而body的发送就需要区分buffering选项了。如下图所示:
下面这部分就是开始发送header,通过调用 ngx_http_send_header最终进入header filter的处理.
    rc = ngx_http_send_header(r);

    if (rc == NGX_ERROR || rc > NGX_OK || r->post_action) {
        ngx_http_upstream_finalize_request(r, u, rc);
        return;
    }
然后就是发送body部分,这里我们先来看buffering被关闭的情况,这里有两个要注意的回调函数,分别是input_filter/input_filter_init,这个filter回调指的是对upstream发送给nginx的数据将要发送前的filter(严格来说是一个body filter).这里如果input_filter没有被设置,则nginx会有默认的回调.后面我们会分析这个默认的filter,以及这个filter具体是需要操作那个数据。要注意,这两个回调都只是针对buffering被关闭的情况,而对应buffering打开的时候的情况,有另外的hook,我们后面会分析到.
    if (!u->buffering) {
//如果input_filter为空,则设置默认的filter
        if (u->input_filter == NULL) {
            u->input_filter_init = ngx_http_upstream_non_buffered_filter_init;
            u->input_filter = ngx_http_upstream_non_buffered_filter;
            u->input_filter_ctx = r;
        }
//设置读写函数
        u->read_event_handler = ngx_http_upstream_process_non_buffered_upstream;
        r->write_event_handler =
                             ngx_http_upstream_process_non_buffered_downstream;

        r->limit_rate = 0;
//调用input filter 初始化函数
        if (u->input_filter_init(u->input_filter_ctx) == NGX_ERROR) {
            ngx_http_upstream_finalize_request(r, u, 0);
            return;
        }
//打开nodelay,准备将数据完全发送出去
        if (clcf->tcp_nodelay && c->tcp_nodelay == NGX_TCP_NODELAY_UNSET) {
            ngx_log_debug0(NGX_LOG_DEBUG_HTTP, c->log, 0, "tcp_nodelay");

            tcp_nodelay = 1;

            if (setsockopt(c->fd, IPPROTO_TCP, TCP_NODELAY,
                               (const void *) &tcp_nodelay, sizeof(int)) == -1)
            {
                ngx_connection_error(c, ngx_socket_errno,
                                     "setsockopt(TCP_NODELAY) failed");
                ngx_http_upstream_finalize_request(r, u, 0);
                return;
            }

            c->tcp_nodelay = NGX_TCP_NODELAY_SET;
        }
//得到将要发送的数据的大小
        n = u->buffer.last - u->buffer.pos;

        if (n) {
//注意这里,可以看到buffer被reset了。
            u->buffer.last = u->buffer.pos;
//设置将要发送的数据大小
            u->state->response_length += n;
//调用input filter
            if (u->input_filter(u->input_filter_ctx, n) == NGX_ERROR) {
                ngx_http_upstream_finalize_request(r, u, 0);
                return;
            }
//最终开始发送数据到downstream
            ngx_http_upstream_process_non_buffered_downstream(r);

        } else {
//说明buffer是空
            u->buffer.pos = u->buffer.start;
            u->buffer.last = u->buffer.start;
//此时刷新数据到client
            if (ngx_http_send_special(r, NGX_HTTP_FLUSH) == NGX_ERROR) {
                ngx_http_upstream_finalize_request(r, u, 0);
                return;
            }
//如果可读,则继续读取upstream的数据.
            if (u->peer.connection->read->ready) {
                ngx_http_upstream_process_non_buffered_upstream(r, u);
            }
        }

        return;
    }
上面的部分我们有2个函数需要详细分析下,一个是input filter的hook,一个是ngx_http_upstream_process_non_buffered_downstream,一个个来,先是input filter的book。
u->input_filter hook主要是对upstream发送的body进行一些处理,类似body filter, 上面的分析中我们可以看到当调用u->input_filter之前将u->buffer.last重置为pos,这个做法我有些不太理解, 我的猜测是让代码更清晰一些,因为在u->input_filter中我们会真正更新u->buffer.last.
在u->input_filter中,主要是会分配一个chain,然后挂载到u->out_bufs上,因为最终nginx会发送u->out_bufs这个chain(后面的代码会看到).并且u->buffer的last也会被更新,我们来看使用最多,也就是默认的u->input_filter的实现:
static ngx_int_t
ngx_http_upstream_non_buffered_filter(void *data, ssize_t bytes)
{
    ngx_http_request_t  *r = data;

    ngx_buf_t            *b;
    ngx_chain_t          *cl, **ll;
    ngx_http_upstream_t  *u;

    u = r->upstream;
//遍历u->out_bufs
    for (cl = u->out_bufs, ll = &u->out_bufs; cl; cl = cl->next) {
        ll = &cl->next;
    }

    cl = ngx_chain_get_free_buf(r->pool, &u->free_bufs);
    if (cl == NULL) {
        return NGX_ERROR;
    }

    *ll = cl;

    cl->buf->flush = 1;
    cl->buf->memory = 1;
//取出将要发送的buffer
    b = &u->buffer;

    cl->buf->pos = b->last;
//更新last
    b->last += bytes;
    cl->buf->last = b->last;
    cl->buf->tag = u->output.tag;
//u->length表示将要发送的数据大小(content_length)如果为NGX_MAX_SIZE_T_VALUE,则说明后端协议并没有指定需要发送的大小,此时我们只需要发送我们接收到的.
    if (u->length == NGX_MAX_SIZE_T_VALUE) {
        return NGX_OK;
    }
//更新将要发送的数据大小
    u->length -= bytes;

    return NGX_OK;
}
然后就是ngx_http_upstream_process_non_buffered_downstream函数,这个函数用于非buffering状态下发送数据给client,它会调用ngx_http_upstream_process_non_buffered_request来发送数据,因此我们就来详细分析这个函数.
这个函数有两个参数,其中第二个do_write表示是否需要立即发送数据.
主要来看这个函数的下面这部分,这部分主要是调用ngx_http_output_filter输出给body filter,然后根据返回值来更新busy_bufs(没有发送完毕,则保存未发送完毕的bufer到busy),可以看到和http部分的处理很类似.
    b = &u->buffer;

    do_write = do_write || u->length == 0;

    for ( ;; ) {

        if (do_write) {
//如果u->out_bufs不为NULL则说明有需要发送的数据,如果u->busy_bufs,则说明上次有未发送完毕的数据.
            if (u->out_bufs || u->busy_bufs) {
                rc = ngx_http_output_filter(r, u->out_bufs);

                if (rc == NGX_ERROR) {
                    ngx_http_upstream_finalize_request(r, u, 0);
                    return;
                }
//更新busy chain
                ngx_chain_update_chains(&u->free_bufs, &u->busy_bufs,
                                        &u->out_bufs, u->output.tag);
            }
//这里说明想要发送的数据都已经发送完毕
            if (u->busy_bufs == NULL) {
//length为0,说明后端这次要发送的数据已经发送完毕
                if (u->length == 0
                    || upstream->read->eof
                    || upstream->read->error)
                {
//此时finalize request,结束这次请求
                    ngx_http_upstream_finalize_request(r, u, 0);
                    return;
                }
//否则重置u->buffer,以便与下次使用
                b->pos = b->start;
                b->last = b->start;
            }
        }
//得到当前buf的剩余空间
        size = b->end - b->last;
//设置size为将要使用的buffer大小
        if (size > u->length) {
            size = u->length;
        }
//如果还有数据需要接受,并且upstream可读,则读取数据
        if (size && upstream->read->ready) {

            n = upstream->recv(upstream, b->last, size);

            if (n == NGX_AGAIN) {
                break;
            }

            if (n > 0) {
                u->state->response_length += n;
//再次调用input_filter,这里没有reset u->buffer.last,这是因为我们这个值并没有更新.
                if (u->input_filter(u->input_filter_ctx, n) == NGX_ERROR) {
                    ngx_http_upstream_finalize_request(r, u, 0);
                    return;
                }
            }
//设置do_write,然后发送数据.
            do_write = 1;

            continue;
        }

        break;
    }
这个函数剩下部分就很简单了,就是挂载事件,删除定时器等一系列操作。
然后我们来看nginx最复杂的一块代码,也就是使用了buffering标记的条件下,nginx如何处理.
这里有一个核心的数据结构ngx_event_pipe_s。接下来,我们就来分析这个结构.
struct ngx_event_pipe_s {
//表示nginx和client,以及和后端的两条连接
    ngx_connection_t  *upstream;
    ngx_connection_t  *downstream;
//保存了从upstream读取的数据(没有经过任何处理的),以及缓存的buf.
    ngx_chain_t       *free_raw_bufs;
    ngx_chain_t       *in;
    ngx_chain_t      **last_in;
//buf到tempfile的数据会放到out中
    ngx_chain_t       *out;
    ngx_chain_t      **last_out;

    ngx_chain_t       *free;
    ngx_chain_t       *busy;

    /*
     * the input filter i.e. that moves HTTP/1.1 chunks
     * from the raw bufs to an incoming chain
     */

    ngx_event_pipe_input_filter_pt    input_filter;
    void                             *input_ctx;
//这个filter就是输出内容到client的函数,一般设置为ngx_chain_writer
    ngx_event_pipe_output_filter_pt   output_filter;
    void                             *output_ctx;
//一些状态以及属性
    unsigned           read:1;
    unsigned           cacheable:1;
    unsigned           single_buf:1;
    unsigned           free_bufs:1;
    unsigned           upstream_done:1;
    unsigned           upstream_error:1;
    unsigned           upstream_eof:1;
    unsigned           upstream_blocked:1;
    unsigned           downstream_done:1;
    unsigned           downstream_error:1;
    unsigned           cyclic_temp_file:1;
//配合bufs使用,表示已经分配了的buf的个数
    ngx_int_t          allocated;
//对应xxx_buffers,也就是读取后端的数据时的bufer大小以及个数
    ngx_bufs_t         bufs;
    ngx_buf_tag_t      tag;

    ssize_t            busy_size;

    off_t              read_length;
//cache相关,max_temp_file_size表示最大的temp file的大小,temp_file_write_size表示buf将会flush到temp file中的大小.
    off_t              max_temp_file_size;
    ssize_t            temp_file_write_size;
//网络相关的参数,定时器,以及lowat
    ngx_msec_t         read_timeout;
    ngx_msec_t         send_timeout;
    ssize_t            send_lowat;

    ngx_pool_t        *pool;
    ngx_log_t         *log;
//预读的buf以及大小,这里预读是指已经从upstream读取了的buf.
    ngx_chain_t       *preread_bufs;
    size_t             preread_size;
//cache相关表示将要cache到文件的buf
    ngx_buf_t         *buf_to_file;
//cache相关,表示temp file
    ngx_temp_file_t   *temp_file;

    /* STUB */ int     num;
};
然后就是ngx_http_upstream_send_response的剩余部分,这部分主要是初始化event pipe结构.
    p = u->pipe;
//设置filter,可以看到就是http的输出filter
    p->output_filter = (ngx_event_pipe_output_filter_pt) ngx_http_output_filter;
    p->output_ctx = r;
    p->tag = u->output.tag;
//设置bufs,它就是upstream中设置的bufs
    p->bufs = u->conf->bufs;
//busy buffers的大小
    p->busy_size = u->conf->busy_buffers_size;
//upstream
    p->upstream = u->peer.connection;
    p->downstream = c;
    p->pool = r->pool;
    p->log = c->log;
//设置是否需要cache
    p->cacheable = u->cacheable || u->store;
//初始化temp_file
    p->temp_file = ngx_pcalloc(r->pool, sizeof(ngx_temp_file_t));
    if (p->temp_file == NULL) {
        ngx_http_upstream_finalize_request(r, u, 0);
        return;
    }

    p->temp_file->file.fd = NGX_INVALID_FILE;
    p->temp_file->file.log = c->log;
    p->temp_file->path = u->conf->temp_path;
    p->temp_file->pool = r->pool;

    if (p->cacheable) {
        p->temp_file->persistent = 1;

    } else {
        p->temp_file->log_level = NGX_LOG_WARN;
        p->temp_file->warn = "an upstream response is buffered "
                             "to a temporary file";
    }
//temp file的相关设置
    p->max_temp_file_size = u->conf->max_temp_file_size;
    p->temp_file_write_size = u->conf->temp_file_write_size;
//初始化preread bufs
    p->preread_bufs = ngx_alloc_chain_link(r->pool);
    if (p->preread_bufs == NULL) {
        ngx_http_upstream_finalize_request(r, u, 0);
        return;
    }

    p->preread_bufs->buf = &u->buffer;
    p->preread_bufs->next = NULL;
    u->buffer.recycled = 1;

    p->preread_size = u->buffer.last - u->buffer.pos;
//设置cache相关
    if (u->cacheable) {

        p->buf_to_file = ngx_calloc_buf(r->pool);
        if (p->buf_to_file == NULL) {
            ngx_http_upstream_finalize_request(r, u, 0);
            return;
        }

        p->buf_to_file->pos = u->buffer.start;
        p->buf_to_file->last = u->buffer.pos;
        p->buf_to_file->temporary = 1;
    }

    if (ngx_event_flags & NGX_USE_AIO_EVENT) {
        /* the posted aio operation may currupt a shadow buffer */
        p->single_buf = 1;
    }

    /* TODO: p->free_bufs = 0 if use ngx_create_chain_of_bufs() */
    p->free_bufs = 1;

    /*
     * event_pipe would do u->buffer.last += p->preread_size
     * as though these bytes were read
     */
    u->buffer.last = u->buffer.pos;

    if (u->conf->cyclic_temp_file) {

        /*
         * we need to disable the use of sendfile() if we use cyclic temp file
         * because the writing a new data may interfere with sendfile()
         * that uses the same kernel file pages (at least on FreeBSD)
         */

        p->cyclic_temp_file = 1;
        c->sendfile = 0;

    } else {
        p->cyclic_temp_file = 0;
    }
//事件相关的初始化
    p->read_timeout = u->conf->read_timeout;
    p->send_timeout = clcf->send_timeout;
    p->send_lowat = clcf->send_lowat;
//挂载读写回调函数,这里注意一个是upstream的读回调,一个是r(client)的写回调
    u->read_event_handler = ngx_http_upstream_process_upstream;
    r->write_event_handler = ngx_http_upstream_process_downstream;
//进入upstream的操作
    ngx_http_upstream_process_upstream(r, u);
通过上面我们可以看到主要操作都在两个回调函数中,一个是upstream的读handler,一个是downstream的写handler,我们一个个看,先来看upstream的读handler。
这个函数首先会判断是否超时,如果超时则设置错误,否则调用ngx_event_pipe进入pipe的读处理,然后调用ngx_http_upstream_process_request对upstream进行处理,比如退出等一系列操作,因此这里最核心的函数就是ngx_event_pipe。
static void
ngx_http_upstream_process_upstream(ngx_http_request_t *r,
    ngx_http_upstream_t *u)
{
    ngx_connection_t  *c;

    c = u->peer.connection;

    ngx_log_debug0(NGX_LOG_DEBUG_HTTP, c->log, 0,
                   "http upstream process upstream");

    c->log->action = "reading upstream";
//判断超时
    if (c->read->timedout) {
        u->pipe->upstream_error = 1;
        ngx_connection_error(c, NGX_ETIMEDOUT, "upstream timed out");

    } else {
//调用event_pipe进对读取数据进行处理.
        if (ngx_event_pipe(u->pipe, 0) == NGX_ABORT) {
            ngx_http_upstream_finalize_request(r, u, 0);
            return;
        }
    }

    ngx_http_upstream_process_request(r);
}
然后来看ngx_event_pipe的源代码,ngx_event_pipe第二个参数是do_write,表示是否需要将数据立即写到downstream,也就是client.
ngx_int_t
ngx_event_pipe(ngx_event_pipe_t *p, ngx_int_t do_write)
{
    u_int         flags;
    ngx_int_t     rc;
    ngx_event_t  *rev, *wev;

    for ( ;; ) {
//判断是否需要将数据写到downstream.
        if (do_write) {
            p->log->action = "sending to client";
//写数据到downstream
            rc = ngx_event_pipe_write_to_downstream(p);

            if (rc == NGX_ABORT) {
                return NGX_ABORT;
            }

            if (rc == NGX_BUSY) {
                return NGX_OK;
            }
        }

        p->read = 0;
        p->upstream_blocked = 0;

        p->log->action = "reading upstream";
//读取数据
        if (ngx_event_pipe_read_upstream(p) == NGX_ABORT) {
            return NGX_ABORT;
        }
//判断是否需要退出循环,p->read表示是否已经读取了upstream的数据,upstream_blocked表示是否downstream可写(后面代码会看到这两个变量的设置)
        if (!p->read && !p->upstream_blocked) {
            break;
        }
//可以看到如果读取了数据就准备写数据到downstream
        do_write = 1;
    }
//判断是否需要挂载读事件
    if (p->upstream->fd != -1) {
        rev = p->upstream->read;

        flags = (rev->eof || rev->error) ? NGX_CLOSE_EVENT : 0;

        if (ngx_handle_read_event(rev, flags) != NGX_OK) {
            return NGX_ABORT;
        }

        if (rev->active && !rev->ready) {
            ngx_add_timer(rev, p->read_timeout);

        } else if (rev->timer_set) {
            ngx_del_timer(rev);
        }
    }
//挂载写事件。
    if (p->downstream->fd != -1 && p->downstream->data == p->output_ctx) {
        wev = p->downstream->write;
        if (ngx_handle_write_event(wev, p->send_lowat) != NGX_OK) {
            return NGX_ABORT;
        }

        if (!wev->delayed) {
            if (wev->active && !wev->ready) {
                ngx_add_timer(wev, p->send_timeout);

            } else if (wev->timer_set) {
                ngx_del_timer(wev);
            }
        }
    }

    return NGX_OK;
}
通过上面的代码我们能看到核心的函数有这么2个,分别是ngx_event_pipe_read_upstream和ngx_event_pipe_write_to_downstream,这两个 一个是从后端都数据,一个是发送数据到前端。其中read最为复杂,因此我们先来看read回调,这个函数比较长,我们一段段的来。
先来看这个函数的一个基本结构:
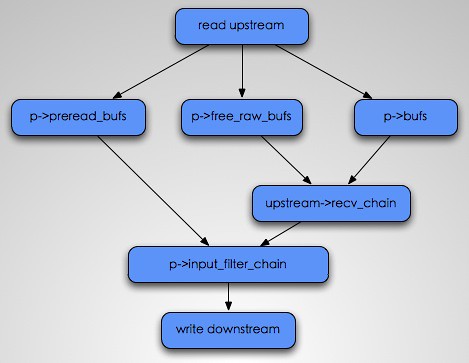
这个函数的主要处理都在一个for循环里面,这个for循环比较长,因此我们就来分段分析这个for循环。这个for循环的主要作用就是从后端读取数据。
因此它首先需要做的就是分配buf,以便于从后端接收数据,可是如果第一次我们接收头的时候,多接收了一些buf,此时我们就先处理这部分buf,然后再接收新的buf.
下面这段主要是进行状态判断,以及当preread_bufs存在的情况的操作。
//判断upstream的状态
        if (p->upstream_eof || p->upstream_error || p->upstream_done) {
            break;
        }
//如果preread_bufs为空(上面的初始化中这个buf也就是upstream读取头的时候,解析完头,然后剩余的buf),并且upstream并不可读,此时则说明对数据也没有任何操作和读取的必要,因此退出循环.
        if (p->preread_bufs == NULL && !p->upstream->read->ready) {
            break;
        }
//如果preread_bufs存在
        if (p->preread_bufs) {

            /* use the pre-read bufs if they exist */
//使用preread_bufs
            chain = p->preread_bufs;
//可以看到设置preread_bufs为空,这样子,下次循环,则会进入另外的处理,也就是需要从upstream读取数据
            p->preread_bufs = NULL;
//n也就是u->buf的大小
            n = p->preread_size;

            ngx_log_debug1(NGX_LOG_DEBUG_EVENT, p->log, 0,
                           "pipe preread: %z", n);

            if (n) {
//设置read,也就是当前upstream中存在读取还没发送的数据.
                p->read = 1;
            }

        }
然后下面这段代码就是当p->preread_bufs为空的情况,此时就需要从upstream来读取数据,而读取之前则需要分配buf,以供upstream使用,因此下面这段代码,就是用来分配buf的。
else {
//首先是看free_raw_bufs是否存在,如果存在,则直接使用它。
            if (p->free_raw_bufs) {

                /* use the free bufs if they exist */

                chain = p->free_raw_bufs;
                if (p->single_buf) {
                    p->free_raw_bufs = p->free_raw_bufs->next;
                    chain->next = NULL;
                } else {
                    p->free_raw_bufs = NULL;
                }

            } else if (p->allocated < p->bufs.num) {
//如果free_raw_bufs不存在,并且分配的buf数量没有超过bufs的个数,此时则创建新的buf
                /* allocate a new buf if it's still allowed */

                b = ngx_create_temp_buf(p->pool, p->bufs.size);
                if (b == NULL) {
                    return NGX_ABORT;
                }

                p->allocated++;

                chain = ngx_alloc_chain_link(p->pool);
                if (chain == NULL) {
                    return NGX_ABORT;
                }

                chain->buf = b;
                chain->next = NULL;

            } else if (!p->cacheable
                       && p->downstream->data == p->output_ctx
                       && p->downstream->write->ready
                       && !p->downstream->write->delayed)
            {
//如果已经分配的bufs的个数大于预设定的个数,并且没有打开cache,而且downstream可写,则设置upstream_blocked,准备写数据到upstream(这个是为了发送数据之后,数据buf能够被使用读)
                p->upstream_blocked = 1;

                ngx_log_debug0(NGX_LOG_DEBUG_EVENT, p->log, 0,
                               "pipe downstream ready");

                break;

            } else if (p->cacheable
                       || p->temp_file->offset < p->max_temp_file_size)
            {
//到达这里有两个情况,一个是cacheable打开,一个是当buf不够用了,此时就会将一部分数据buf到temp file中。这个函数我下篇blog会详细分析,这次之需要知道这个将会将数据buf到temp file,然后绑定到p->out中。
                rc = ngx_event_pipe_write_chain_to_temp_file(p);

                ngx_log_debug1(NGX_LOG_DEBUG_EVENT, p->log, 0,
                               "pipe temp offset: %O", p->temp_file->offset);
//处理返回值
                if (rc == NGX_BUSY) {
                    break;
                }

                if (rc == NGX_AGAIN) {
                    if (ngx_event_flags & NGX_USE_LEVEL_EVENT
                        && p->upstream->read->active
                        && p->upstream->read->ready)
                    {
                        if (ngx_del_event(p->upstream->read, NGX_READ_EVENT, 0)
                            == NGX_ERROR)
                        {
                            return NGX_ABORT;
                        }
                    }
                }

                if (rc != NGX_OK) {
                    return rc;
                }
//说明写成功,此时free_raw_bufs已经被重新赋值,也就是我们可以使用,所以类似上面free_raw_bufs存在的处理
                chain = p->free_raw_bufs;
                if (p->single_buf) {
                    p->free_raw_bufs = p->free_raw_bufs->next;
                    chain->next = NULL;
                } else {
                    p->free_raw_bufs = NULL;
                }

            } else {

                /* there are no bufs to read in */

                ngx_log_debug0(NGX_LOG_DEBUG_EVENT, p->log, 0,
                               "no pipe bufs to read in");

                break;
            }
//开始从后端读取数据,可以看到数据被读取进chain,n表示读到的字节数
            n = p->upstream->recv_chain(p->upstream, chain);

            ngx_log_debug1(NGX_LOG_DEBUG_EVENT, p->log, 0,
                           "pipe recv chain: %z", n);
//如果将chain添加到free_raw_bufs的开头
            if (p->free_raw_bufs) {
                chain->next = p->free_raw_bufs;
            }
            p->free_raw_bufs = chain;
//设置error
            if (n == NGX_ERROR) {
                p->upstream_error = 1;
                return NGX_ERROR;
            }

            if (n == NGX_AGAIN) {
                if (p->single_buf) {
                    ngx_event_pipe_remove_shadow_links(chain->buf);
                }

                break;
            }
//设置read,表示已经读取了数据
            p->read = 1;
//如果返回0,则说明对端关闭了连接
            if (n == 0) {
                p->upstream_eof = 1;
                break;
            }
        }
然后就是for循环的最后一段,到达这一段说明从后端的数据已经读取到了chain中,然后n为已经读取的数据,于是开始遍历已经读取的chain。
它会遍历chain,然后调用input_filter来将buf拷贝到 p->in/last_in 中,最后将chain free掉。这里buf 会有一个shadow 的域,在遍历chain的时候,需要将对应buf的shadow删除掉。
对于shadow域我是这么理解的,就是每次我们在input_filter中拷贝cl->buf的域到p->in/last_in的buf域的时候,也就是制造了一个cl->buf的影子,而他们是共享对应的内存。此时这两个buf就是互相shadow的。他们的shadow域都是指向对方。不过这个域我觉得并不是很必须,上次在邮件列表也看到igor说不喜欢这东西,不过不知道什么时候能删掉它.
//更新已经读取了的字节数
        p->read_length += n;
        cl = chain;
        p->free_raw_bufs = NULL;
//开始遍历chain,
        while (cl && n > 0) {
//首先remove shadow buf
            ngx_event_pipe_remove_shadow_links(cl->buf);
//得到当前的chain buf的空间大小(因为读取数据,是从cl->buf->last开始的)
            size = cl->buf->end - cl->buf->last;
//如果已经读取的字节数大于等于chain buf,则对当前的buf进行更新。
            if (n >= size) {
//更新last
                cl->buf->last = cl->buf->end;

                /* STUB */ cl->buf->num = p->num++;
//调用input_filter
                if (p->input_filter(p, cl->buf) == NGX_ERROR) {
                    return NGX_ABORT;
                }
//更新n/cl 最终free chain
                n -= size;
                ln = cl;
                cl = cl->next;
                ngx_free_chain(p->pool, ln);

            } else {
//否则则说明当前的chain是最后一个chain,因此更新last,然后设置n,以便与退出循环。这里要注意,可以看到nginx并没有调用input_filter,这是因为,nginx会尽量的使cl->buf最大情况下调用p->input_filter,不过这里会有个问题,当cl->buf没有最大,此时后端断开连接,这时就会少调用一次p->input_filter.不过nginx在最后会处理这个问题的。
                cl->buf->last += n;
                n = 0;
            }
        }
//如果cl还存在,则说明我们开始设置的chain,只有一部分被使用了,因此此时将这写chain保存到free_raw_bufs中。可以看到如果chain只有一部分被使用,然后当再次循环,则使用的chain会直接使用free_raw_bufs,也就是我们前一次没有使用完全的chain
        if (cl) {
            for (ln = cl; ln->next; ln = ln->next) { /* void */ }

            ln->next = p->free_raw_bufs;
            p->free_raw_bufs = cl;
        }
上面的p->input_filter我们后面再分析,先来看函数剩余的部分剩余的这一部分主要是处理free_raw_bufs,调用p->input_filter,将free_raw_bufs中的数据保存发送chain中,这个就是为了解决前面少调用一次p->input_filter的情况。
    if ((p->upstream_eof || p->upstream_error) && p->free_raw_bufs) {

        /* STUB */ p->free_raw_bufs->buf->num = p->num++;
//调用input_filter.
        if (p->input_filter(p, p->free_raw_bufs->buf) == NGX_ERROR) {
            return NGX_ABORT;
        }

        p->free_raw_bufs = p->free_raw_bufs->next;
//遍历,然后
        if (p->free_bufs && p->buf_to_file == NULL) {
            for (cl = p->free_raw_bufs; cl; cl = cl->next) {
                if (cl->buf->shadow == NULL) {
                    ngx_pfree(p->pool, cl->buf->start);
                }
            }
        }
    }
//如果cache打开,并且p->in存在(也就是有读取的数据),则写数据到temp file。
    if (p->cacheable && p->in) {
        if (ngx_event_pipe_write_chain_to_temp_file(p) == NGX_ABORT) {
            return NGX_ABORT;
        }
    }
然后来看p->input_filter的实现,这里我们就来分析,nginx默认实现的一个ngx_event_pipe_copy_input_filter,其中proxy等模块都是调用这个filter。它主要是拷贝buf(不是buf的内容,只是buf的属性)到p->in或者p->last_in,这两个域都是用来和write数据的时候交互用的。这两个域的区别是这样子的
p->in只能保存一个chain,而p->in这条链上的剩余的chain都保存在p->last_in中,这么做的原因还不太清楚,而且搜索了下代码,last_in也没有被使用到.
ngx_int_t
ngx_event_pipe_copy_input_filter(ngx_event_pipe_t *p, ngx_buf_t *buf)
{
    ngx_buf_t    *b;
    ngx_chain_t  *cl;

    if (buf->pos == buf->last) {
        return NGX_OK;
    }
//如果free存在,则从free中取得缓存的buf
    if (p->free) {
        cl = p->free;
        b = cl->buf;
        p->free = cl->next;
        ngx_free_chain(p->pool, cl);

    } else {
//否则分配buf
        b = ngx_alloc_buf(p->pool);
        if (b == NULL) {
            return NGX_ERROR;
        }
    }
//拷贝buf的属性
    ngx_memcpy(b, buf, sizeof(ngx_buf_t));
    b->shadow = buf;
    b->tag = p->tag;
    b->last_shadow = 1;
    b->recycled = 1;
    buf->shadow = b;
//分配chain
    cl = ngx_alloc_chain_link(p->pool);
    if (cl == NULL) {
        return NGX_ERROR;
    }

    cl->buf = b;
    cl->next = NULL;

    ngx_log_debug1(NGX_LOG_DEBUG_EVENT, p->log, 0, "input buf #%d", b->num);

    if (p->in) {
        *p->last_in = cl;
    } else {
        p->in = cl;
    }
    p->last_in = &cl->next;

    return NGX_OK;
}
这次就分析到这里,下次将会分析upstream的数据发送的部分。
Related posts:
转载请注明:爱开源 » nginx中upstream的设计和实现(四)