一、查看是否安装 VNC
好像 6.0 以后VNC名字 由 vnc 改成 tigervnc
[root@xen ~]# rpm -qa|grep tigervnc
tigervnc-1.0.90-0.17.20110314svn4359.el6.x86_64
tigervnc-server-1.0.90-0.17.20110314svn4359.el6.x86_64
如果没有就安装下了
[root@xen ~]# yum install tigervnc tigervnc-server
添加启动项
[root@xen ~]# chkconfig –add vncserver
[root@xen ~]# chkconfig vncserver on
二、设置 VNC 密码
[root@xen ~]# vncserver
Creating default startup script /root/.vnc/xstartup
Starting applications specified in /root/.vnc/xstartup
Log file is /root/.vnc/xen:1.log
会在当前用户主目录下 生成 .vnc 目录和配置文件
[root@xen ~]# vncpasswd
Password:
Verify:
设置的密码保存在 /root/.vnc/passwd
三、VNC 配置
修改 xstartup 文件 把最后的 twm & 删掉 加上 gnome-session &
[root@xen ~]# cd /root/.vnc/
[root@xen .vnc]# tail -n 3 xstartup
xsetroot -solid grey
xterm -geometry 80×24+10+10 -ls -title “$VNCDESKTOP Desktop” &
gnome-session &
如果直接 启动
[root@xen .vnc]# /etc/init.d/vncserver start
正在启动 VNC 服务器:no displays configured [失败]
所以要修改 /etc/sysconfig/vncservers 文件添加以下内容
VNCSERVERS=”2:root”
桌面号:用户 监听 590* 端口
VNCSERVERARGS[2]=”-geometry 800×600″
这样修改后,就算 /etc/inittab 启动模式为 3 也可以正常进入图形界面
启动 vncserver
[root@xen ~]# /etc/init.d/vncserver start
正在启动 VNC 服务器:2:root xauth: (stdin):1: bad display name “xen:2” in “add” command
New ‘xen:2 (root)’ desktop is xen:2
Starting applications specified in /root/.vnc/xstartup
Log file is /root/.vnc/xen:2.log
[确定]
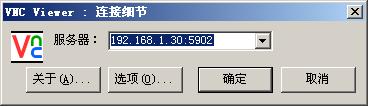
四、VNC 连接
 相关日志Xen 下安装 Linux
Centos Xen 安装
命令行下实现VNC反向连接
最后编辑: selboo 编辑于2012/04/06 13:31
转载请注明:爱开源 » Centos 6.2 开启 VNC